環境
- Raspbian Stretch Lite
- Raspberry Pi Zero WまたはRaspberry Pi Model A+
- 開発環境は、Windows PC
- Stretch ZIPファイルのダウンロード
Raspbian Stretch Lite 2017-08-16のZIPファイルをダウンロードし、解凍し、2017-08-16-raspbian-stretch-lite.imgファイルを取り出します。 - SDカードのフォーマット
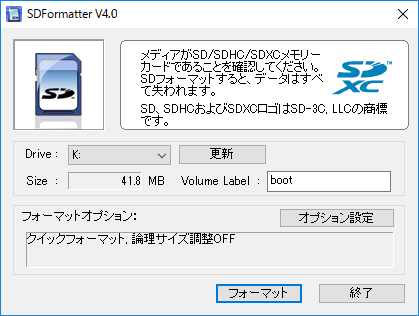
未使用のSDカードの場合には、SD FormatterでSDカードのフォーマットをする必要はありませんが、RaspbianをインストールしたSDカードを再利用する場合、Windows上からはSDカードの記憶容量が小さいものとしてしか認識されません。このような場合には、SD FormatterでSDカードのフォーマットを行う必要があります。
- イメージファイルをSDカードに書き込み
Win32 Disk Imagerを使い、2017-08-16-raspbian-stretch-lite.imgファイルをSDカードに書き込みます。

- SDカードを実装
このSDカードをRaspberry Piに実装します。さらに、HDMIケーブルとUSBキーボードを接続し、電源用のmicro USBコネクターにケーブルを接続し、電源を入れます。 - ログイン
Raspbian OSのインストールが完了します。キー入力の文字は緑色にします。最初のパスワードのままでは、セキュリティが低いので変更する必要があります。
ユーザー名:pi
パスワード:raspberry - piユーザーのパスワード設定
ログイン後、Raspbian OSの設定を行います。pi@raspberrypi:~$プロンプトは今後 $ にします。
pi@raspberrypi:~$ sudo raspi-config
1 Change User Password Change password for the current user
↓
You will now be ask to enter a new password for the pi User
新しいパスワードをキー入力。確認も含めると同じパスワードを2回キー入力します。 - ロケールの設定(raspi-configを継続)
4 Localisation Options Set up language and regional settings to math your location
↓
I1 Change Locale Set up language and regional settings to match your location
↓
[*] en_GB.UTF-8 UTF-8
[*] ja_JP.EUC=JP EUC-JP
[*] ja_JP.UTF-8 UTF-8
↓
<Ok> → en_GB.UTF-8を選択した状態で → <Ok> - Timezoneの設定(raspi-configを継続)
4 Localisation Options Set up language and regional settings to math your location
↓
I2 Change Timezone Set up timezone to match your location
↓
Asia
↓
Tokyo - Keyboard Layoutの設定(raspi-configを継続)I3 Change Keyboard Layout Set the keyboard layout to match your keyboard
↓
Generic 105-key (Intl) PC
↓
Other
↓
Japanese
↓
Japanese – Japanese (OADG 109A)
↓
The default for the keyboard layout
↓
No compose key - SDカードの記憶領域を拡張(raspi-configを継続)
7 Advance Options Configure advance settings
↓
A1 Expand Filesystem Ensures that all of the SD card storage is available to the OS - Overscanの設定(raspi-configを継続)
7 Advance Options Configure advance settings
↓
A2 Overscan You may need to configure overscan if black bars are present on display - Pi Cameraを有効にする設定(raspi-configを継続)
5 Interfacing Options Configure connections to peripherals
↓
P1 Camera Enable/Disable connection to the Raspberry Pi Camera - SSHを有効にする設定(raspi-configを継続)
5 Interfacing Options Configure connections to peripherals
↓
P2 SSH Enable/Disable remote command line access to your Pi using SSH - I2Cを有効にする設定(raspi-configを継続)
5 Interfacing Options Configure connections to peripherals
↓
P5 I2C Enable/Disable automatic loading of I2C kernel module - Boot Optionの設定(raspi-configを継続)
3 Boot Options Configure options for start-up
↓
B1 Desktop/CLI Choose whether to boot into desktop environment or the command line
↓
B1 Console Text console, requiring user to login
ここで、raspi-configを Finish します。 - パッケージとファームウェアのアップデート
$ sudo apt-get update
$ sudo apt-get upgrade
$ sudo rpi-update